Introduction
A dual PC streaming setup is the gold standard for professional streamers who want to achieve the highest quality broadcasts without compromising gaming performance. By dedicating one PC to gaming and another to handling the streaming workload, you can play at maximum settings and framerates while simultaneously delivering a high-quality stream to your viewers.
This guide will walk you through everything you need to know about setting up a dual PC streaming configuration, from hardware requirements to software configuration, audio routing, and troubleshooting common issues.
Before You Begin
A dual PC setup is more complex and expensive than a single PC solution. If you're new to streaming, you might want to start with a single PC setup and upgrade to dual PC when you've outgrown its capabilities. Check our Ultimate Streaming Setup Guide for more information on single PC streaming.
Why Use a Dual PC Setup?
There are several compelling reasons to consider a dual PC streaming setup:
- Dedicated Resources: Your gaming PC can focus entirely on running your game at maximum performance, while your streaming PC handles encoding, overlays, alerts, and other streaming tasks.
- Higher Quality Stream: With dedicated encoding resources, you can use slower encoding presets for better quality without impacting your gameplay.
- Stability: If one PC encounters issues, the other can continue functioning, reducing the chance of complete stream failure.
- Multitasking: You can manage your stream, chat, and other applications on the streaming PC without affecting your gaming experience.
Basic Dual PC Setup Overview
Basic diagram showing the connection between gaming PC, capture card, and streaming PC
Hardware Requirements
Setting up a dual PC streaming configuration requires specific hardware components. Let's break down what you'll need for both your gaming PC and streaming PC.
Gaming PC Specifications
Your gaming PC should be powerful enough to run your games at your desired settings and framerates. Here are the recommended specifications:
CPU
RecommendedIntel Core i7/i9 (13th/14th gen) or AMD Ryzen 7/9 (7000 series)
Since the gaming PC doesn't handle encoding, you can prioritize gaming performance with high clock speeds and good single-core performance.
GPU
RecommendedNVIDIA RTX 4070 or better / AMD RX 7700 XT or better
Your GPU should match your gaming resolution and refresh rate goals. For 1440p 144Hz+ gaming, an RTX 4070 or better is recommended.
RAM
Recommended32GB DDR4/DDR5 (3600MHz+ for DDR4, 5200MHz+ for DDR5)
Modern games are increasingly memory-hungry. 32GB provides ample headroom for gaming and background applications.
Storage
Recommended1TB+ NVMe SSD (PCIe Gen 4 recommended)
Fast storage ensures quick game loading times and system responsiveness.
Video Output
RequiredGPU with at least two video outputs:
- One for your gaming monitor
- One for the capture card connection to your streaming PC
Most modern GPUs have multiple outputs (HDMI, DisplayPort), so this is rarely an issue.
Streaming PC Specifications
Your streaming PC handles encoding, overlays, alerts, and other streaming tasks. Here are the recommended specifications:
CPU
RecommendedIntel Core i7 (12th gen or newer) or AMD Ryzen 7 (5000 series or newer)
For x264 encoding, more cores/threads are beneficial. If using NVENC encoding, CPU requirements are less demanding.
GPU
RecommendedNVIDIA RTX 3060 or better (for NVENC encoding)
If using x264 (CPU) encoding, a less powerful GPU like a GTX 1660 Super would be sufficient.
RAM
Recommended32GB DDR4 (3200MHz+)
Streaming software, browser sources, and other applications can be memory-intensive. 32GB provides ample headroom.
Storage
Recommended500GB+ NVMe SSD for OS and applications + 2TB+ HDD/SSD for recordings
Fast primary storage ensures system responsiveness, while larger secondary storage accommodates recordings and VODs.
Repurposing an Old PC
If you're upgrading your gaming PC, your old system might be suitable as a streaming PC. Even systems that are 2-3 generations old can often handle streaming duties effectively, especially with a modern GPU for NVENC encoding.
Capture Cards
A capture card is the bridge between your gaming PC and streaming PC, allowing the streaming PC to receive and encode the video output from your gaming PC.
Internal PCIe Capture Cards
Elgato 4K60 Pro MK.2
~$250-300A premium internal PCIe capture card that supports up to 4K60 HDR capture with very low latency.
Pros: Lower latency, reliable connection, no USB bandwidth issues
Cons: Requires PCIe slot, more complex installation
Learn MoreAVerMedia Live Gamer 4K GC573
~$250-300Another excellent PCIe capture card supporting 4K60 HDR capture with RGB lighting effects.
Pros: Low latency, reliable performance, RGB lighting
Cons: Requires PCIe slot, software not as polished as Elgato
Learn MoreExternal USB Capture Cards
Elgato HD60 S+
~$180-200A popular external USB 3.0 capture card supporting up to 1080p60 passthrough with HDR.
Pros: Easy setup, portable, no PCIe slot required
Cons: Slightly higher latency than PCIe cards, requires USB 3.0 bandwidth
Learn MoreAVerMedia Live Gamer ULTRA GC553
~$180-200External USB 3.0 capture card supporting up to 4K passthrough and 1080p60 capture.
Pros: 4K passthrough, portable, no PCIe slot required
Cons: Higher latency than PCIe cards, requires USB 3.0 bandwidth
Learn MoreUSB Capture Card Considerations
When using USB capture cards, ensure your streaming PC has a high-quality USB controller. Some motherboards have better USB controllers than others, which can affect capture stability. USB 3.0 or higher is required for HD capture.
Audio Equipment
Audio routing is one of the most complex aspects of a dual PC setup. Here are some hardware options to simplify the process:
Audio Mixer/Interface
RecommendedOptions:
- GoXLR/GoXLR Mini: Purpose-built for streamers with intuitive controls and routing (~$200-400)
- Focusrite Scarlett 2i2: Professional audio interface for XLR microphones (~$160)
- BEHRINGER XENYX Q802USB: Affordable mixer with multiple inputs (~$80)
A hardware mixer allows you to route different audio sources (microphone, game audio, chat, etc.) independently and send them to your streaming PC.
Audio Cables
RequiredDepending on your setup, you'll need various audio cables:
- 3.5mm TRS/TRRS cables: For connecting line-out to line-in
- XLR cables: For professional microphones
- RCA cables: For some mixer connections
- Optical cables: For digital audio connections
Quality cables reduce interference and ensure clean audio transmission.
Additional Hardware
These additional components can enhance your dual PC streaming setup:
Stream Deck
OptionalElgato Stream Deck (available in 6, 15, or 32 key configurations)
A Stream Deck allows you to control both PCs with customizable buttons for scene switching, audio adjustments, and more.
Learn MoreKVM Switch
OptionalA KVM (Keyboard, Video, Mouse) switch allows you to control both PCs with a single keyboard and mouse setup.
Alternatively, software solutions like Mouse Without Borders or Synergy can achieve similar functionality over your network.
HDMI Splitter
OptionalAn HDMI splitter can duplicate your gaming PC's output to both your monitor and capture card, useful in certain setups.
Ensure you get a splitter (not just a switch) that supports your desired resolution and refresh rate.
Connection Methods
There are two primary methods for connecting your gaming PC to your streaming PC: using a capture card or using NDI (Network Device Interface). Each has its advantages and disadvantages.
Capture Card Method
The capture card method is the most common and reliable approach for dual PC streaming.
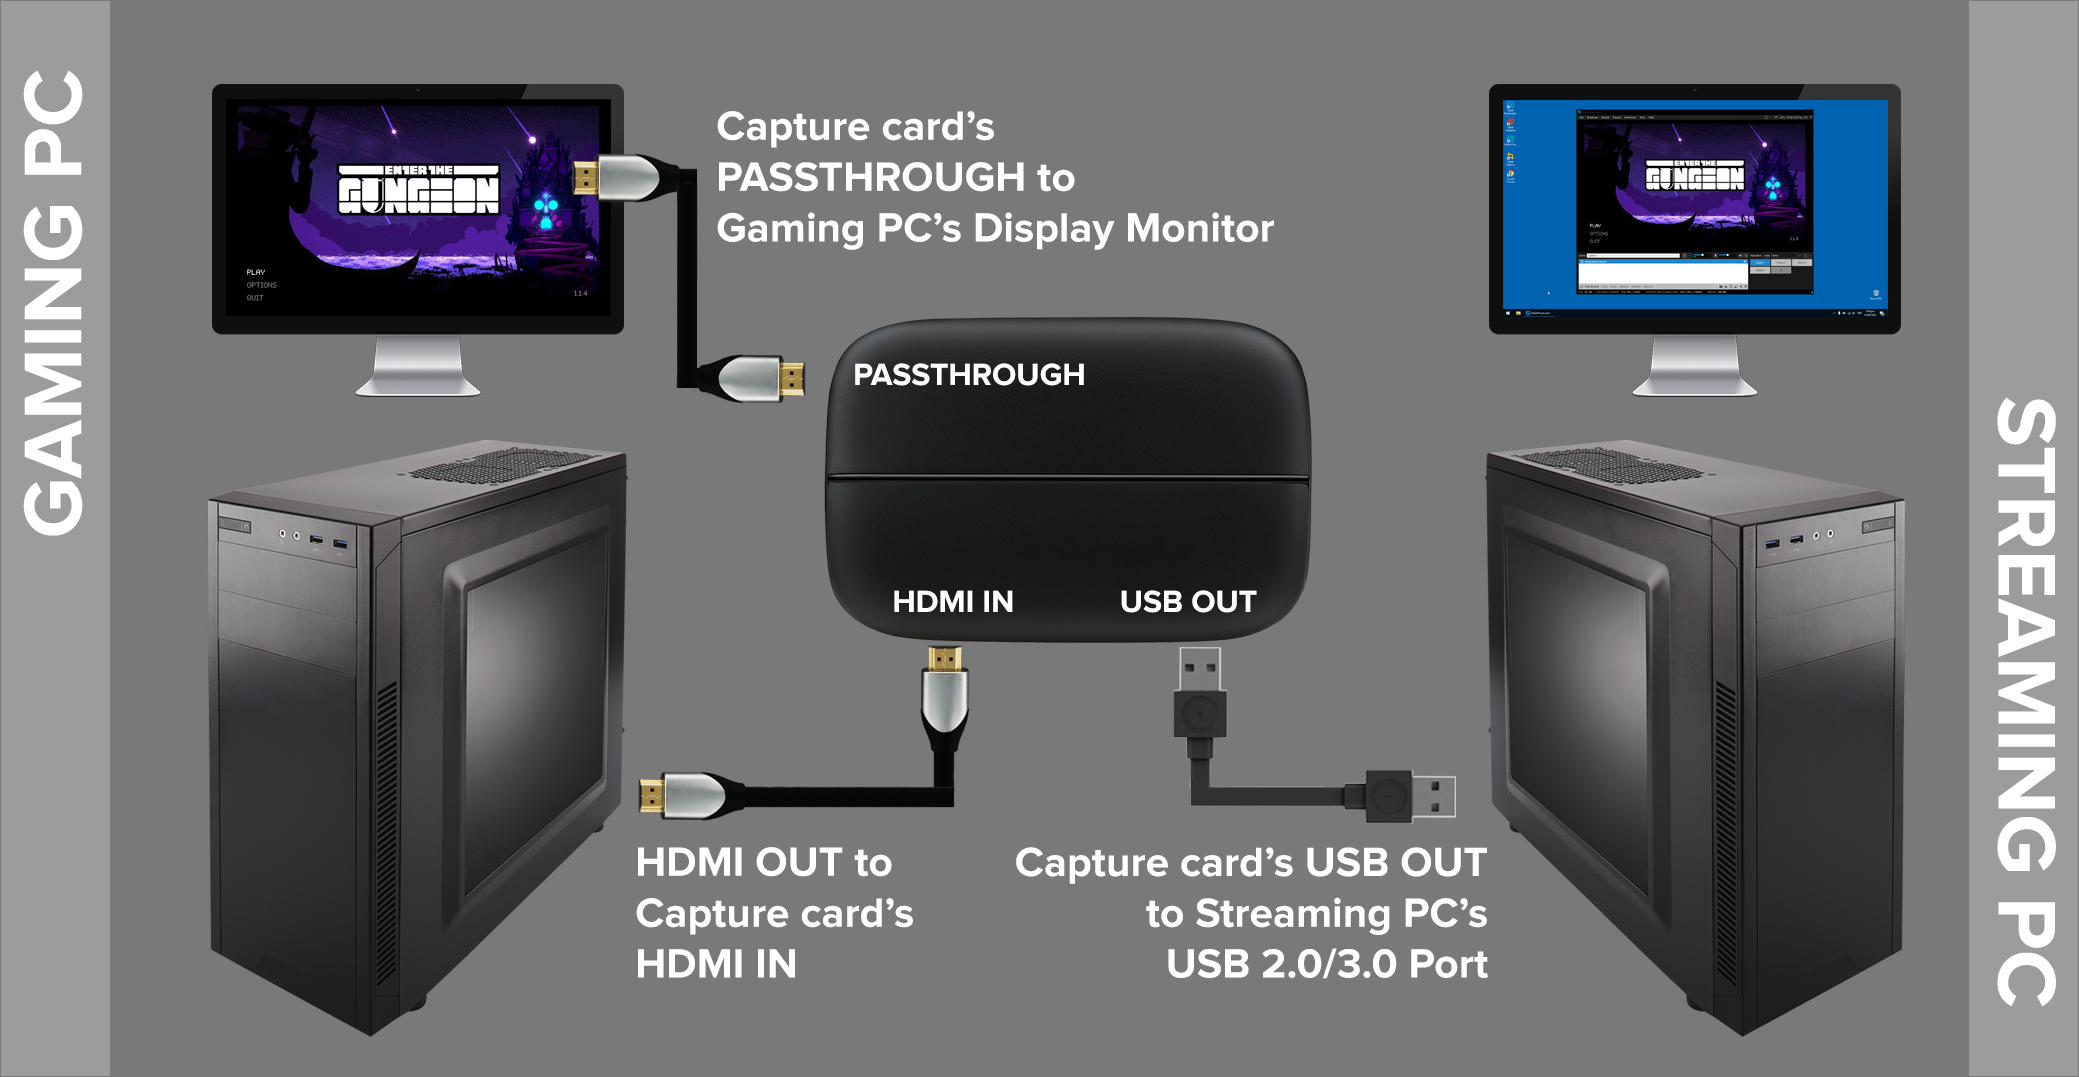
Capture Card Connection Diagram
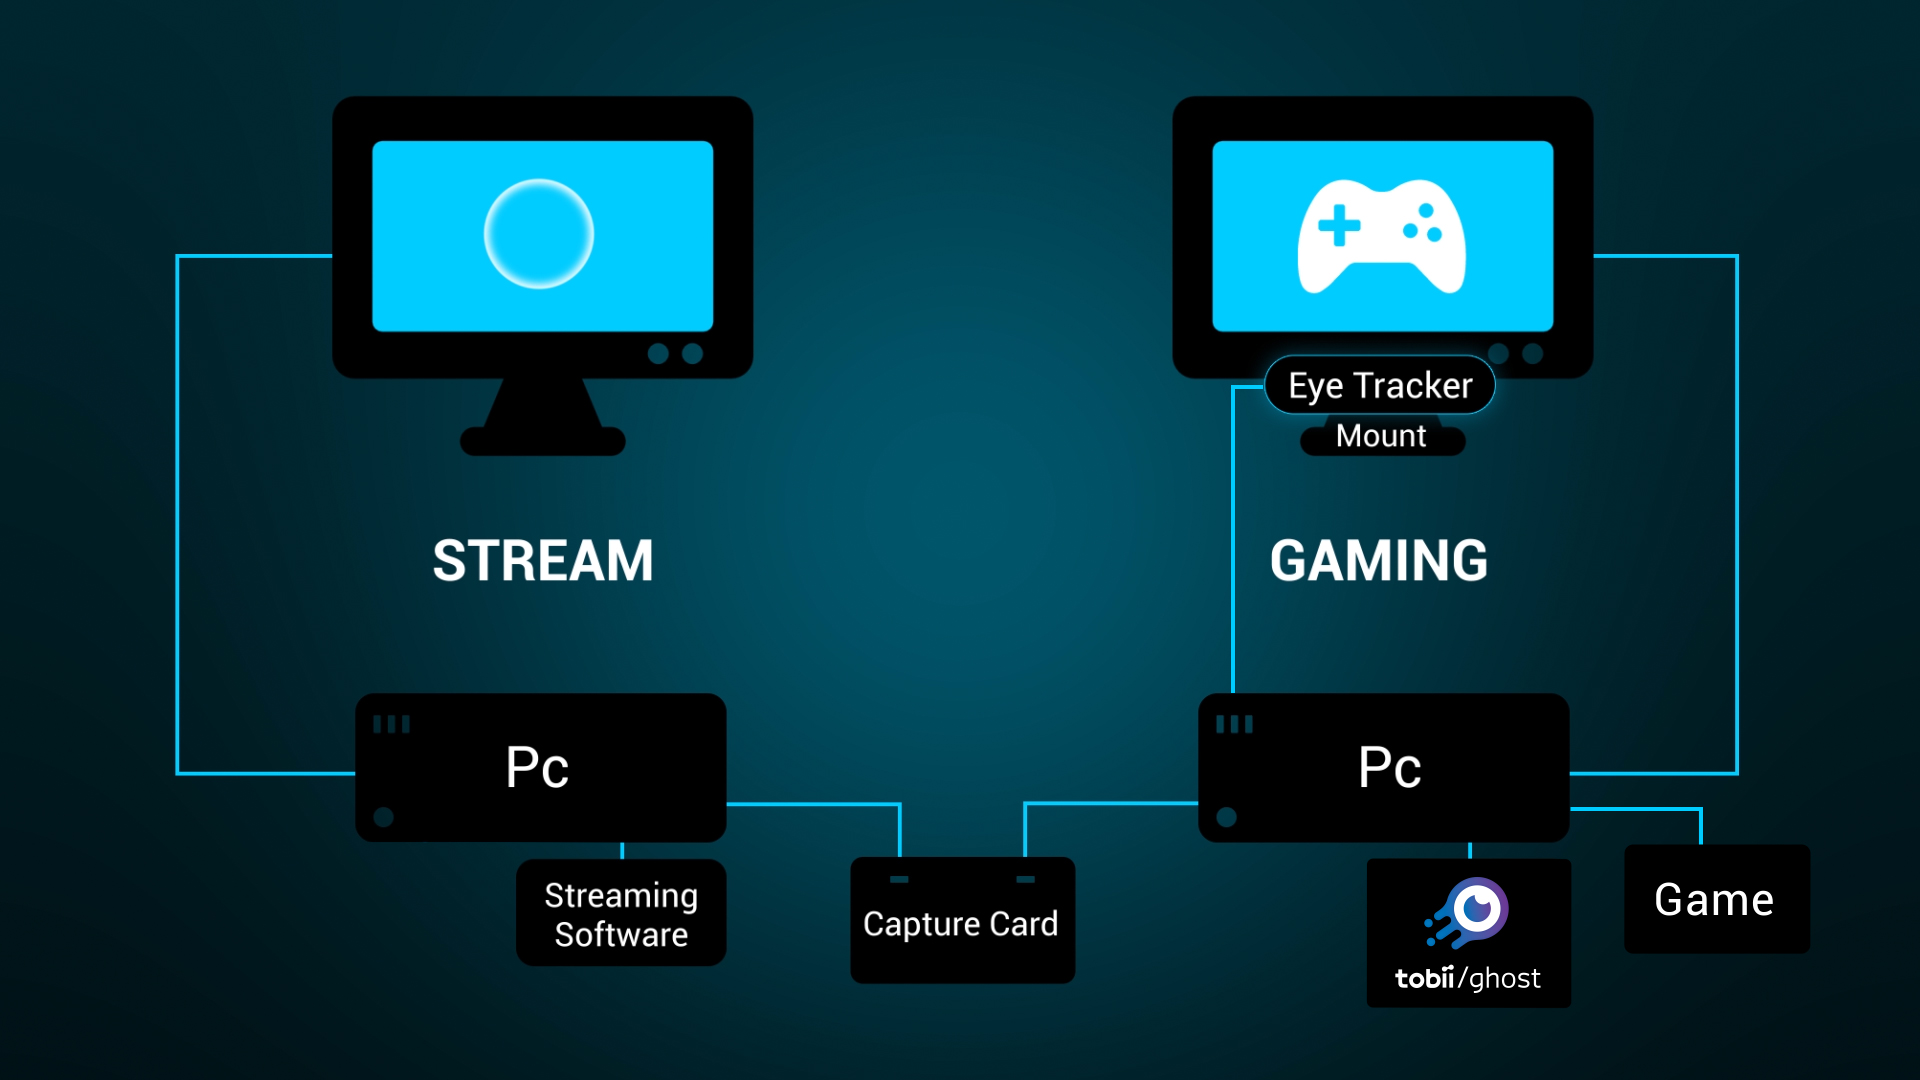
Diagram showing how to connect gaming PC to streaming PC using a capture card
Basic Setup Steps:
- Install the capture card in your streaming PC (for internal PCIe cards) or connect it via USB (for external cards).
- Connect an HDMI cable from your gaming PC's GPU output to the capture card's input.
- Connect your gaming monitor to another output on your gaming PC's GPU.
- Install capture card drivers and software on your streaming PC.
- Configure OBS on your streaming PC to use the capture card as a video source.
Display Cloning vs. Extended Desktop
You can either clone your display (same output to monitor and capture card) or use an extended desktop (different outputs). Cloning is simpler but may limit your refresh rate to what the capture card supports. Extended desktop allows your monitor to run at full refresh rate while the capture card receives a 60Hz signal.
Advantages of Capture Card Method:
- Reliability: Direct hardware connection is more stable than network-based solutions
- Low Latency: Minimal delay between gaming PC output and streaming PC input
- Quality: Consistent video quality regardless of network conditions
- No CPU Overhead: Minimal impact on gaming PC performance
Disadvantages of Capture Card Method:
- Cost: Quality capture cards can be expensive
- Additional Hardware: Requires physical cards and cables
- Audio Complexity: Audio routing can be more complicated
NDI Method
NDI (Network Device Interface) is a software-based solution that transmits video and audio over your local network.
NDI Connection Diagram
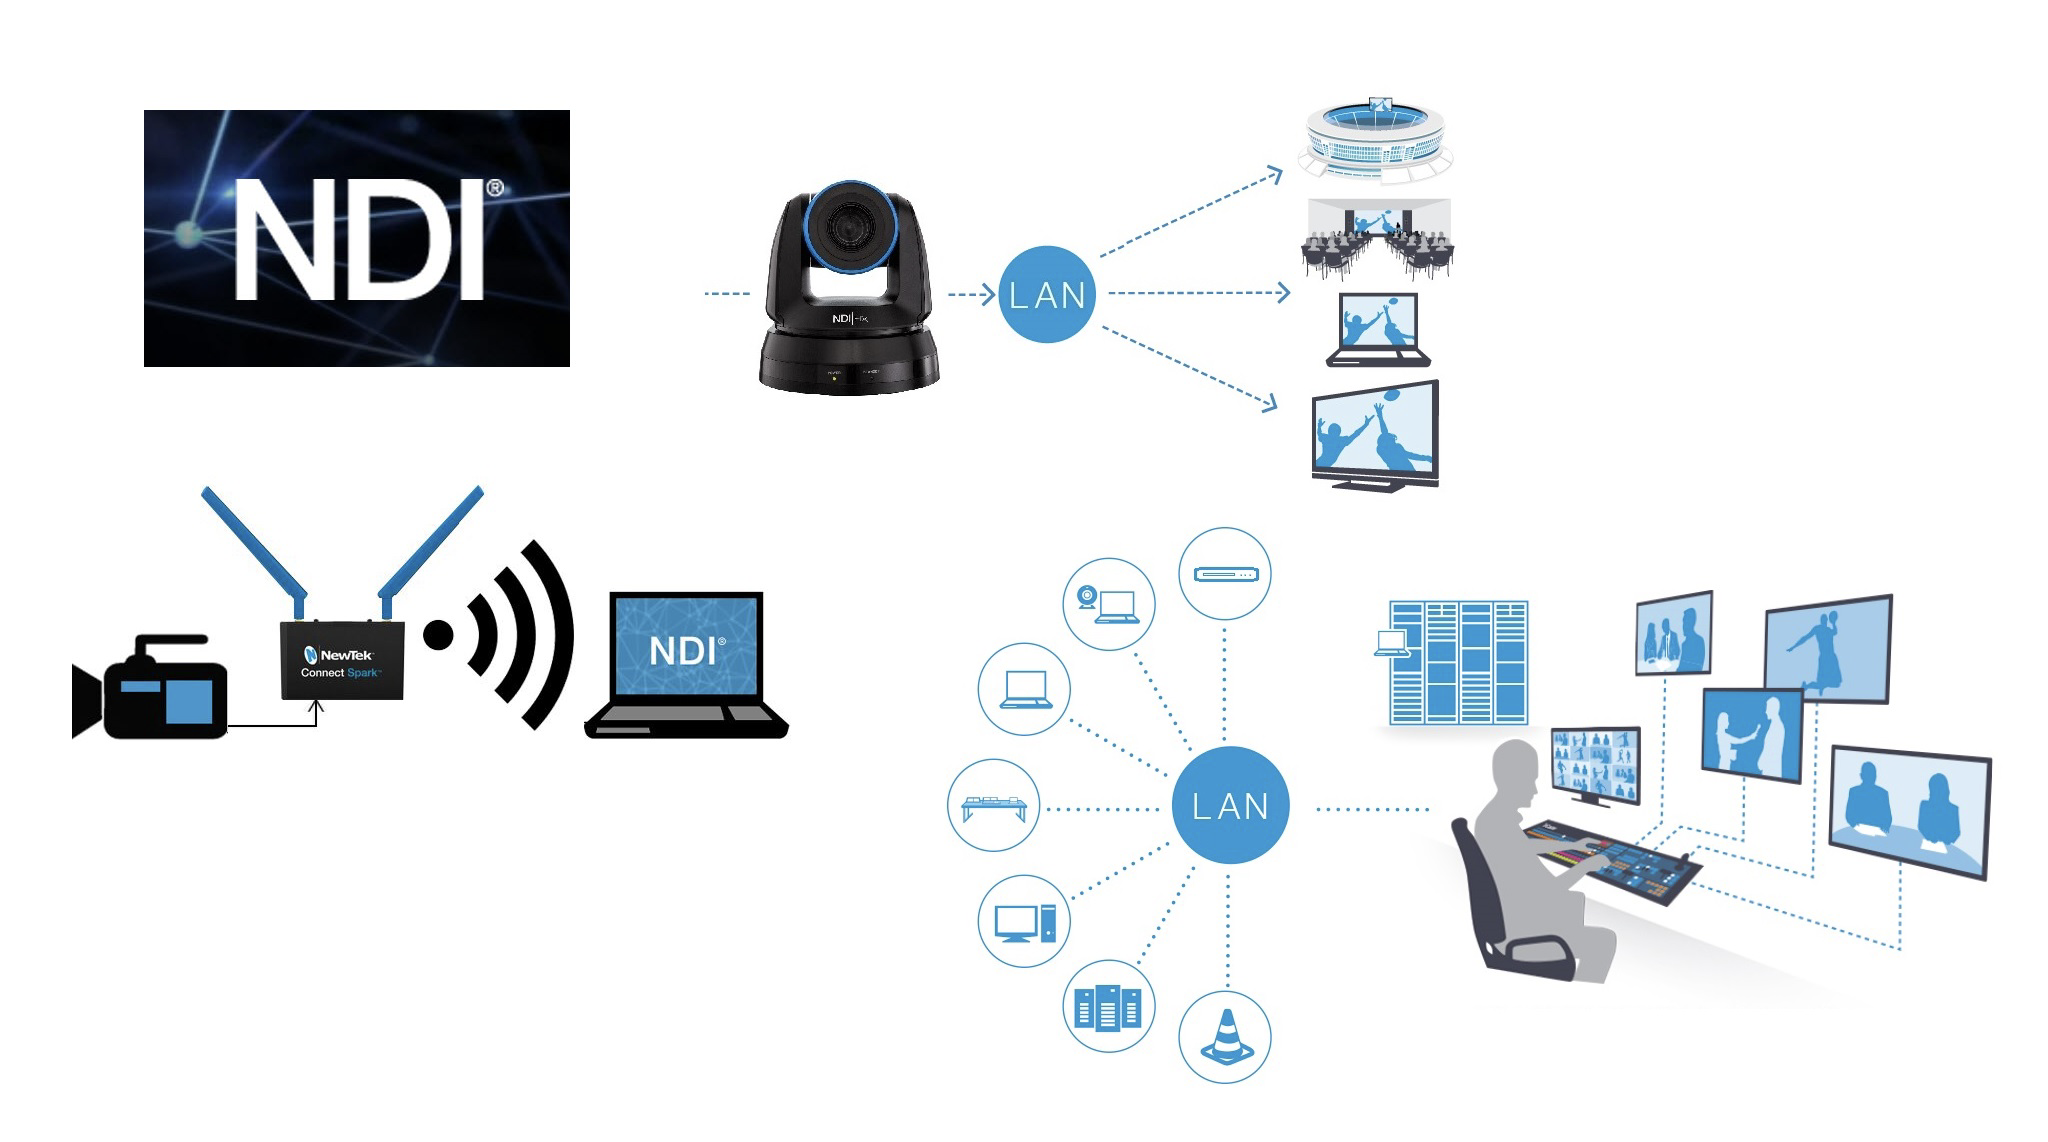
Diagram showing how to connect gaming PC to streaming PC using NDI over network
Basic Setup Steps:
- Install NDI Tools on both your gaming PC and streaming PC.
- Install the NDI plugin for OBS on both PCs.
- Configure OBS on your gaming PC to output via NDI.
- Configure OBS on your streaming PC to receive the NDI source.
- Ensure both PCs are connected to the same network via ethernet (not Wi-Fi).
Network Requirements for NDI
NDI requires a strong, stable network connection. Always use wired ethernet connections (not Wi-Fi) with gigabit speeds. Ideally, use a dedicated network switch connecting only your gaming and streaming PCs to minimize interference and maximize bandwidth.
Advantages of NDI Method:
- Cost: No additional hardware required beyond network equipment
- Simplicity: No physical cards to install or cables to route
- Audio Integration: Audio is transmitted alongside video over the network
- Flexibility: Can transmit multiple sources over the same network
Disadvantages of NDI Method:
- Performance Impact: Uses CPU/GPU resources on your gaming PC
- Network Dependency: Quality and reliability depend on your network
- Higher Latency: Generally higher delay than capture card solutions
- Bandwidth Intensive: Requires a robust network infrastructure
Hybrid Approach
Some streamers use a hybrid approach: capture card for video and NDI for additional sources like webcams or screen regions. This combines the reliability of hardware capture with the flexibility of NDI.
Audio Routing
Audio routing is often the most challenging aspect of a dual PC streaming setup. You need to ensure that your microphone, game audio, chat audio, and other sound sources are properly routed to your streaming PC.
Audio Routing Challenges
In a dual PC setup, you need to manage several audio streams:
- Microphone Audio: Your voice needs to go to both your streaming PC (for the broadcast) and potentially your gaming PC (for in-game chat)
- Game Audio: Sound from your games needs to reach both your headphones and your streaming PC
- Chat Audio: Discord or other communication apps need to be heard by you and included in the stream
- Stream Alerts: Notification sounds need to be heard by you without creating feedback loops
Hardware Audio Routing Solutions
Hardware solutions provide the cleanest and most reliable audio routing for dual PC setups.
GoXLR / GoXLR Mini Method
GoXLR Setup
RecommendedThe TC Helicon GoXLR and GoXLR Mini are purpose-built for streamers and provide an intuitive solution for dual PC audio routing.
Basic Setup:
- Connect your microphone to the GoXLR's XLR input
- Connect the GoXLR to your streaming PC via USB
- Connect your gaming PC's audio output to the GoXLR's Line In
- Connect your headphones to the GoXLR's headphone output
- Use the GoXLR software to route audio sources to different channels
The GoXLR allows you to create separate mixes for what you hear versus what your stream hears, with physical faders for real-time adjustments.
Learn More about GoXLRAudio Interface / Mixer Method
Audio Interface Setup
AlternativeStandard audio interfaces like the Focusrite Scarlett series or mixing boards can also be used for dual PC setups.
Basic Setup:
- Connect your microphone to the audio interface
- Connect the audio interface to your streaming PC via USB
- Use a line-out from your gaming PC to an input on your audio interface
- Connect your headphones to the audio interface's headphone output
- Configure your DAW or mixer software to route signals appropriately
This method requires more manual configuration but can be more cost-effective than specialized streaming hardware.
Software Audio Routing Solutions
If you prefer not to invest in additional hardware, software solutions can provide flexible audio routing capabilities.
Voicemeeter Potato Method
Voicemeeter Setup
Software SolutionVoicemeeter Potato is a powerful virtual audio mixer that can handle complex routing scenarios.
Basic Setup:
- Install Voicemeeter Potato on your gaming PC
- Set Voicemeeter as your default audio device
- Connect your microphone to your gaming PC
- Route your microphone and game audio to different Voicemeeter virtual outputs
- Use these virtual outputs as audio sources in your capture software
Voicemeeter provides virtual audio cables that can route audio between applications and devices with great flexibility.
Download Voicemeeter PotatoNDI Audio Method
NDI Audio Setup
Software SolutionIf you're using NDI for video, you can also leverage it for audio routing.
Basic Setup:
- Install NDI Tools on both PCs
- Configure OBS on your gaming PC to include the audio sources you want to stream
- Output this mix via NDI
- Capture the NDI source (with audio) on your streaming PC
This method simplifies setup but gives you less granular control over individual audio sources.
Audio Sync Issues
One common challenge with dual PC setups is audio synchronization. Video capture introduces a slight delay, which can cause your audio and video to be out of sync. Most streaming software includes audio delay filters that can be used to compensate for this. Start with a 650ms delay on your microphone and adjust as needed.
Software Configuration
Proper software configuration is essential for a smooth dual PC streaming experience. This section covers the setup of OBS Studio on both your gaming and streaming PCs.
Gaming PC Software Setup
Your gaming PC's software configuration depends on which connection method you're using.
For Capture Card Method:
Configure Display Settings
Set up your displays in Windows to either clone or extend your desktop:
- Clone Display: Right-click desktop > Display settings > Multiple displays > Duplicate these displays
- Extend Display: Right-click desktop > Display settings > Multiple displays > Extend these displays
If using extended display mode, set your capture card output to 1080p60 while keeping your main gaming monitor at your preferred resolution and refresh rate.
Configure Audio Settings
Set up your audio routing based on your chosen method:
- If using hardware audio routing, ensure your game audio is output to the appropriate device
- If using software audio routing (like Voicemeeter), configure your default audio devices accordingly
For capture cards that support audio over HDMI, ensure your gaming PC is outputting audio through HDMI to the capture card.
For NDI Method:
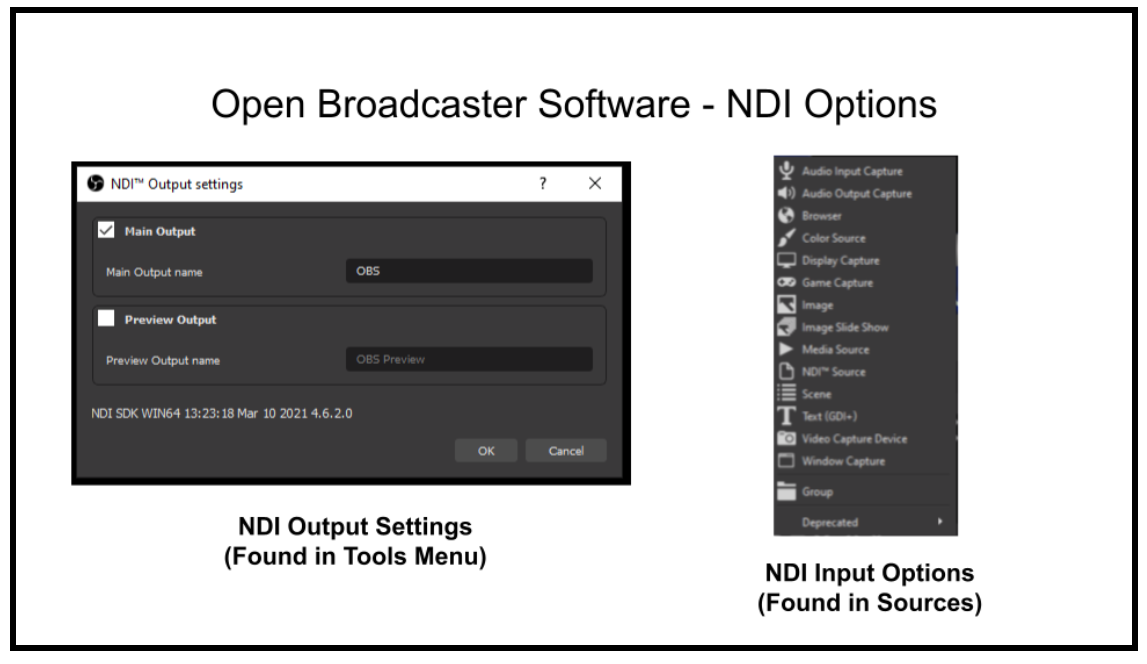
Configure OBS for NDI Output
Set up OBS to output your gameplay via NDI:
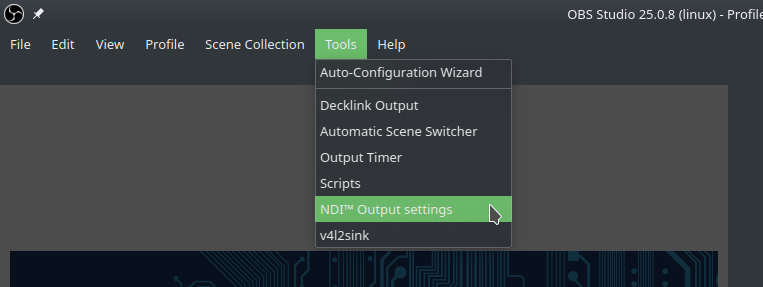
- Open OBS Studio on your gaming PC
- Add your game capture, display capture, or window capture sources
- Go to Tools > NDI Output Settings
- Enable Main Output and give it a name (e.g., "Gaming PC")
- Optionally enable "Audio" if you want to send audio through NDI
Optimize OBS Settings
Configure OBS for optimal performance on your gaming PC:
- Set Output Resolution to match your target streaming resolution (typically 1080p)
- Set Frame Rate to your target streaming frame rate (typically 60fps)
- In Advanced settings, set Process Priority to "Above Normal" or "High"
- Disable Preview to reduce CPU usage
Since you're only using OBS to send NDI output (not encoding), you can disable any unnecessary plugins and features to minimize resource usage.
Streaming PC Software Setup
Your streaming PC handles the encoding and broadcasting of your stream. Here's how to set it up:
For Capture Card Method:
Install Capture Card Drivers and Software
Install the necessary drivers and software for your capture card:
- For Elgato cards: Elgato Game Capture Software or drivers
- For AVerMedia cards: AVerMedia RECentral or drivers
- For other cards: Refer to the manufacturer's website
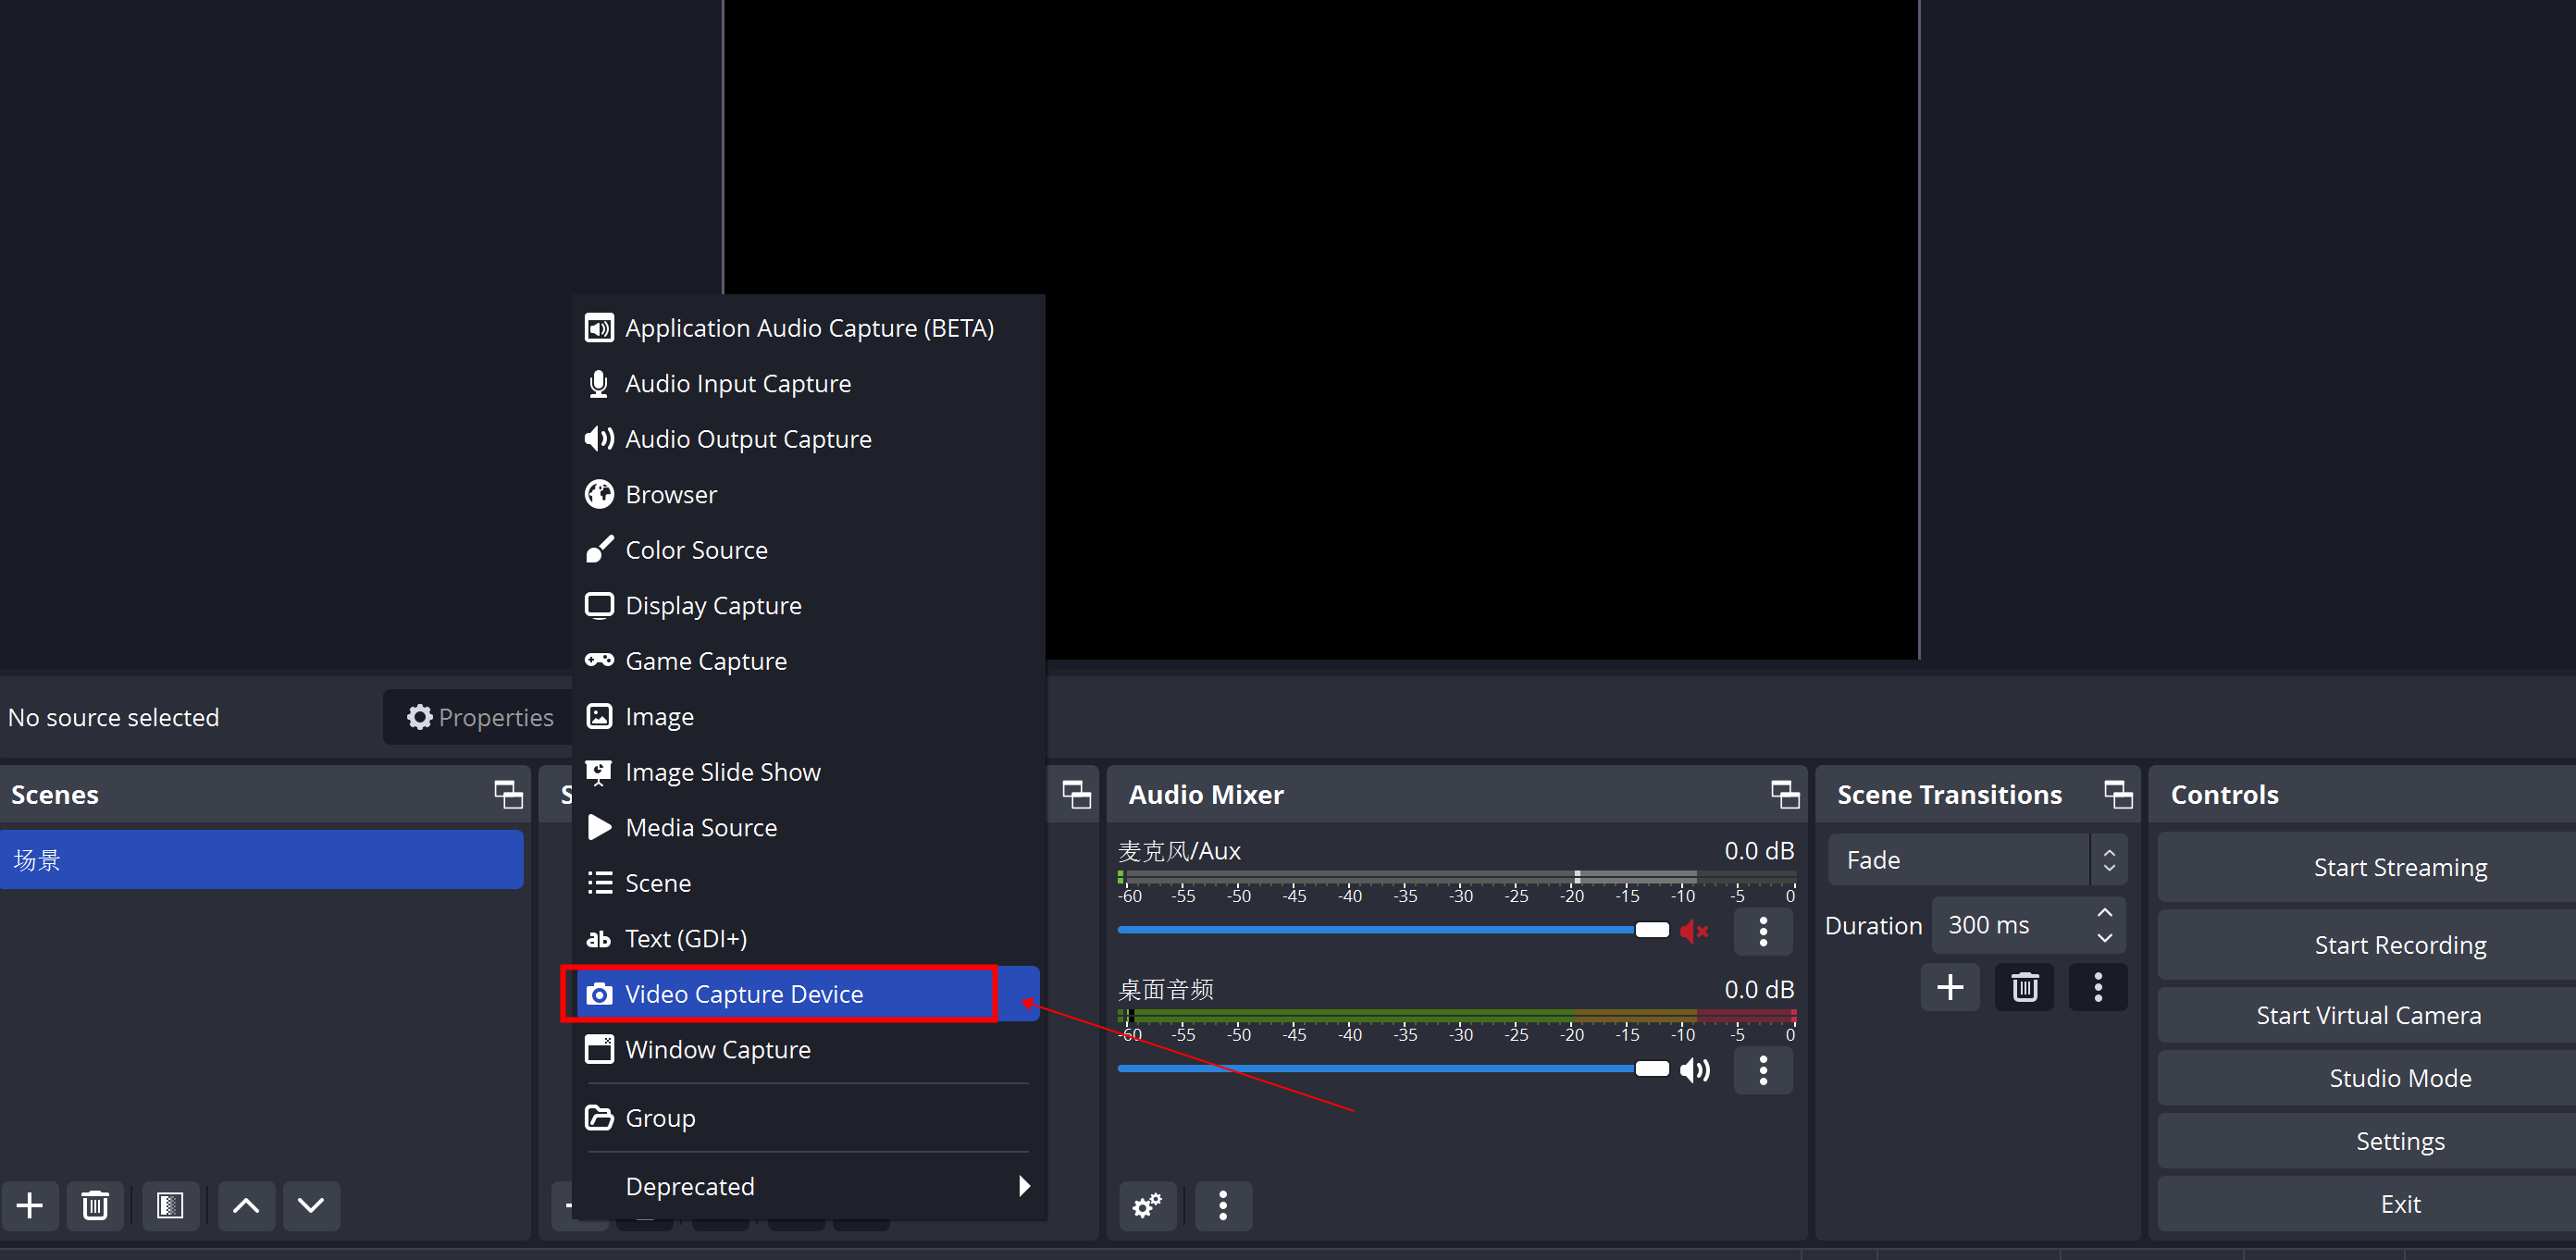
Configure OBS Studio
Set up OBS to capture and encode your stream:
- Open OBS Studio on your streaming PC
- Add a Video Capture Device source and select your capture card
- Configure the capture card properties (resolution, frame rate, etc.)
- Add audio sources based on your audio routing setup
For NDI Method:
Install Required Software
Install the same software as on your gaming PC:
Add NDI Source in OBS
Configure OBS to receive the NDI feed from your gaming PC:
- Open OBS Studio on your streaming PC
- Click the + icon in the Sources panel
- Select "NDI Source" from the list
- Name your source and click OK
- In the properties dialog, select your gaming PC's NDI output from the dropdown
- Configure any other settings as needed and click OK
Encoding Settings for Streaming PC
One of the main advantages of a dual PC setup is the ability to use more demanding encoding settings without impacting gameplay. Here are recommended settings for your streaming PC:
x264 CPU Encoding Settings
x264 Settings
CPU Encoding- Encoder: x264
- Rate Control: CBR (Constant Bitrate)
- Bitrate: 6000-8000 Kbps for 1080p60 (adjust based on your internet upload speed)
- CPU Usage Preset: Medium or Slow (slower presets provide better quality but require more CPU power)
- Keyframe Interval: 2 seconds
- Profile: High
- Tune: None or "zerolatency"
With a dedicated streaming PC, you can use slower presets like "medium" or even "slow" for better quality, which wouldn't be possible on a single PC setup.
NVENC GPU Encoding Settings
NVENC Settings
GPU Encoding- Encoder: NVIDIA NVENC H.264 (New)
- Rate Control: CBR
- Bitrate: 6000-8000 Kbps for 1080p60
- Preset: Quality or Max Quality
- Profile: High
- Look-ahead: Enabled
- Psycho Visual Tuning: Enabled
- Max B-frames: 2
NVENC encoding is less CPU-intensive and can be a good option even on a dedicated streaming PC, especially if you're running other CPU-intensive tasks like complex browser sources or plugins.
Troubleshooting Common Issues
Dual PC streaming setups can introduce various technical challenges. Here are solutions to the most common issues:
Video Issues
Possible causes and solutions:
- HDCP Protection: Some content is protected by HDCP and won't display through capture cards. Ensure HDCP is disabled in your gaming PC's graphics settings.
- Resolution/Refresh Rate Mismatch: Ensure your output resolution and refresh rate are supported by your capture card.
- Cable Issues: Try different HDMI cables, preferably ones rated for the resolution and refresh rate you're using.
- Driver Issues: Update or reinstall your capture card drivers.
- Power Cycle: Disconnect and reconnect the capture card, or restart both PCs.
Possible causes and solutions:
- For Capture Card Method:
- Ensure your capture card is connected to a USB 3.0 port (for USB capture cards)
- Try a different PCIe slot (for internal capture cards)
- Update your motherboard's USB or PCIe drivers
- Reduce the resolution or refresh rate being sent to the capture card
- For NDI Method:
- Ensure both PCs are connected via ethernet to the same network
- Use a gigabit network switch for direct connection between PCs
- Reduce the NDI bandwidth in the NDI settings
- Close bandwidth-intensive applications on both PCs
Possible causes and solutions:
- RGB Range Mismatch: Ensure both your gaming PC and capture card are using the same RGB range (Full or Limited).
- Color Space Issues: Check if your capture card supports the color space being output by your gaming PC (sRGB, Rec. 709, etc.).
- HDR Content: Most capture cards don't properly handle HDR content. Disable HDR in your gaming PC's display settings.
- Filter Correction: Add color correction filters in OBS to adjust the captured video.
Audio Issues
Possible causes and solutions:
- HDMI Audio Not Enabled: Ensure audio over HDMI is enabled in your gaming PC's sound settings.
- Capture Card Audio Settings: Check that your capture card is set to capture audio in its properties in OBS.
- Audio Routing Issues: Verify your audio routing setup and ensure the correct devices are selected in OBS.
- Muted Sources: Check if any audio sources are muted in OBS or your audio mixer.
- Driver Issues: Update or reinstall audio drivers on both PCs.
Possible causes and solutions:
- Capture Delay: Video capture introduces a slight delay. Add an audio delay filter to your microphone and other audio sources in OBS.
- Starting Point: Begin with a 650-700ms delay on your microphone and adjust as needed.
- Testing Method: Record yourself counting numbers while tapping your desk. Play back the recording and adjust the delay until the sound of tapping matches the visual.
- Different Delays for Different Sources: You may need different delay values for different audio sources.
Possible causes and solutions:
- Multiple Audio Paths: Ensure your audio isn't being routed through multiple paths simultaneously.
- Monitor Settings: Check OBS monitor settings for audio sources and ensure you're not monitoring the same audio multiple times.
- Software Mixing Issues: If using Voicemeeter or similar software, ensure you're not creating feedback loops in your virtual routing.
- NDI Audio Duplication: If using NDI, make sure you're not capturing the same audio source both through NDI and through another method.
Performance Issues
Possible causes and solutions:
- Encoding Preset Too Demanding: Use a faster x264 preset (e.g., "fast" instead of "medium").
- Consider GPU Encoding: Switch to NVENC or AMD encoder if available.
- Too Many Browser Sources: Reduce the number of browser sources or limit their refresh rate.
- Background Applications: Close unnecessary applications running on your streaming PC.
- Windows Game Mode: Disable Windows Game Mode on your streaming PC.
- Process Priority: Set OBS process priority to "Above Normal" or "High" in Task Manager.
Possible causes and solutions:
- NDI Bandwidth: Lower the NDI bandwidth in the NDI settings.
- Resolution Scaling: Reduce the output resolution in OBS on your gaming PC.
- Frame Rate: Consider lowering the frame rate of the NDI output.
- Hardware Acceleration: Ensure hardware acceleration is enabled for NDI.
- Consider Capture Card: If performance impact is too significant, consider switching to a capture card solution.
Possible causes and solutions:
- Internet Connection: Run a speed test to verify your upload bandwidth.
- Bitrate Too High: Lower your streaming bitrate.
- Server Selection: Try a different streaming server closer to your location.
- Network Congestion: Use a wired ethernet connection instead of Wi-Fi.
- Background Downloads/Uploads: Ensure no other applications are using significant bandwidth.
- QoS Settings: Configure QoS (Quality of Service) on your router to prioritize streaming traffic.
Advanced Tips and Optimizations
Once you have your basic dual PC streaming setup working, consider these advanced tips to further enhance your setup:
Keyboard and Mouse Sharing
Control both PCs with a single keyboard and mouse using these methods:
Software KVM Solutions
Recommended- Mouse Without Borders: Free Microsoft tool that allows you to control multiple PCs with a single mouse and keyboard. Download
- Synergy: Cross-platform software that enables sharing of mouse and keyboard between multiple computers. Learn More
- Input Director: Windows-specific software for controlling multiple PCs. Download
These software solutions work over your network and allow seamless transition between computers by moving your mouse to the edge of the screen.
Hardware KVM Switches
AlternativeHardware KVM (Keyboard, Video, Mouse) switches allow you to physically switch your peripherals between multiple computers:
- Basic KVM: Simple switches that toggle keyboard and mouse between computers
- Advanced KVM: Support for multiple monitors, USB devices, and audio switching
- Gaming KVM: Specialized switches that support high refresh rates and resolutions
When selecting a KVM switch, ensure it supports your monitor's resolution and refresh rate if you plan to switch your display as well.
Remote Control Solutions
Control your streaming PC remotely from your gaming PC:
Stream Deck Multi Actions
RecommendedIf you have an Elgato Stream Deck, you can control both PCs simultaneously:
- Connect your Stream Deck to your gaming PC
- Install Stream Deck software on both PCs
- Set up Stream Deck Multi Actions to control OBS on your streaming PC
- Use the Stream Deck to trigger scene changes, start/stop streaming, and control other functions
This provides a seamless control experience without needing to physically interact with your streaming PC.
OBS WebSocket
AdvancedControl OBS on your streaming PC remotely using the WebSocket protocol:
- Install the OBS WebSocket plugin on your streaming PC
- Configure a password and enable the WebSocket server
- Use WebSocket client applications or custom scripts on your gaming PC to control OBS
- Popular clients include OBS Remote, Touch Portal, and custom Stream Deck profiles
This method provides extensive control over OBS functions without direct interaction with the streaming PC.
Optimizing Stream Quality
Take advantage of your dual PC setup to maximize stream quality:
Advanced x264 Settings
Quality EnhancementWith a dedicated streaming PC, you can use more advanced x264 settings:
- Slower Presets: Try "medium" or even "slow" presets for better quality
- Custom x264 Options: Add parameters like "rc-lookahead=60" or "trellis=2" for better quality
- Tune Settings: Experiment with different tune options like "film" or "animation" based on your content
These settings would be too demanding for a single PC setup but are viable with a dedicated encoding machine.
Dual Recording Setup
Content CreationRecord high-quality local footage while streaming:
- Configure your gaming PC to record gameplay at high quality (high bitrate, lossless)
- Simultaneously stream at standard quality from your streaming PC
- This provides high-quality footage for YouTube videos while maintaining a stable stream
This approach is perfect for content creators who repurpose their streams for YouTube or other platforms.
Conclusion
Setting up a dual PC streaming configuration requires more initial investment and configuration than a single PC setup, but the benefits in terms of performance, quality, and reliability make it worthwhile for serious streamers.
With this guide, you should now have a comprehensive understanding of:
- The hardware requirements for both your gaming and streaming PCs
- Different connection methods (capture card vs. NDI)
- Audio routing solutions for clean, professional sound
- Software configuration for optimal performance
- Troubleshooting common issues
- Advanced optimizations to take your setup to the next level
Remember that setting up a dual PC streaming configuration is an iterative process. Start with the basics, get everything working, and then gradually refine and optimize your setup over time. Don't be afraid to experiment with different settings and configurations to find what works best for your specific needs and equipment.
Happy streaming!
Stay Updated
Streaming technology evolves rapidly. Check back for updates to this guide, and join our Discord community to discuss dual PC setups with other streamers and stay informed about the latest techniques and technologies.
Additional Resources
Here are some valuable resources to help you further optimize your dual PC streaming setup:
OBS Forums
CommunityThe official OBS forums are an excellent resource for troubleshooting and advanced configuration tips.
Visit OBS ForumsEposVox YouTube Channel
TutorialEposVox provides in-depth tutorials on streaming setups, including dual PC configurations.
Visit Channelr/Twitch Subreddit
CommunityThe Twitch subreddit has a wealth of information and a helpful community for streaming-related questions.
Visit r/TwitchStreamElements University
TutorialStreamElements offers comprehensive guides on stream setup, including dual PC configurations.
Visit StreamElements UniversityElgato Knowledge Base
DocumentationOfficial documentation and guides for Elgato capture cards and streaming products.
Visit Elgato Help CenterNDI Documentation
DocumentationOfficial documentation for NDI technology and implementation guides.
Visit NDI Tools